How to get started airbrushing miniatures
There are many uses for an airbrush in miniature painting. Achieving a smooth base coat quickly and easily, blended highlights, shadows and colour gradients, special effects to impress your friends on the tabletop or in the display cabinet! On a practical level, you can prime and varnish your models indoors, no matter the weather outside, save money on spray cans and generally speed up army painting – which is something I’m sure will appeal to all hobbyists 😉
Introduction
I decided to write this guide because it’s something people ask about quite regularly and I thought it would be useful to gather the information in one place. This is not a guide on airbrushing techniques, or learning how to actually use an airbrush, but more a guide for absolute beginners looking to get started – what equipment you will need or may find useful, some practical tips & tricks, and solutions to common problems you may encounter.
When it comes to equipment there are many options out there and I don’t think anyone can claim to be able to say this is “the best” airbrush or “the best” compressor etc. For one thing, no one has tried every product in every situation, and in many cases it comes down to personal preference and what’s “best” for one person might not be for another. So rather than dictate exactly which make and model you should buy, I will guide you through the general features to look for and give feedback on the equipment I have experience with. Then you can make your own choices based on the features you know you’ll need and your budget.
On the subject of budget, getting everything you need for an airbrush setup can be a fairly substantial investment. The good news is that there is equipment available at a broad range of price levels, and even the mid-level in terms of price will get you quality that will last for many years. Some items you may only need to buy once and they will last a lifetime with care. As with many things in life, you may want to avoid the extremely cheap options if you don’t want to end up replacing too soon, but you don’t need to go top of the line to get decent quality either.
I’ve divided the guide into three three main sections; Essential Equipment, Highly Recommended and Cleaning & Maintenance. The first section contains the bare minimum items you will need to get started, the second are things you will probably want right away or at least pretty soon! And the last section covers the cleaning, maintenance and care of your airbrush. There is also a Troubleshooting section at the end dealing with some of the common problems you may encounter and how to resolve them.
Right, let’s get started!
Jump to section
1. Essential Equipment
Airbrush

This is, as you might expect, the most important piece of equipment and the one you’ll probably give most thought to when choosing. For that reason it’s worth going for the best quality you can afford – though, as mentioned above, good quality doesn’t have to cost the Earth.
Feed & Trigger Type
There are various different types of airbrush – gravity-fed, side-fed, syphon-fed, single-action, dual-action, pistol-trigger etc. The type that is best for our purposes and the main features you want to look for are:
- Gravity feed
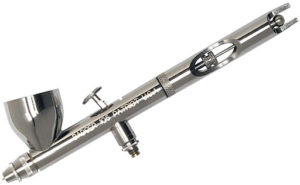
‘Feed’ refers to how the paint is ‘fed’ into the airbrush, and ‘gravity feed’ is where the paint cup sits on top of the airbrush, above and behind the head (as shown on the Iwata Custom Micron B pictured above) - Dual-action
This means that you press the trigger down for air and pull back for paint – so you can control these things indepentdently of each other – which is very important!
Needle & Nozzle Size
This corresponds to the ‘fineness’ of line that can be achieved with the airbrush. You can think of it like brush sizes where 0 is small, 1 is medium, 2 is large etc. But airbrush needles / nozzles are measured in decimals of a millimeter – 0.2mm, 0.3mm, 0.4mm etc. You might at first think that smallest is best – but remember that you may want to paint large vehicles or busts as well as tiny details on infantry! So the ideal is to have something that will give you a broad range of applications. You can buy needle and nozzle sets separately for many airbrushes to give you more flexibility, and this is a feature worth considering when choosing your airbrush. To get started, anything between 0.2mm and 0.5mm will give you the range for most applications.
Stop Mechanism
Some airbrushes have an adjustable control at the back for limiting how far the trigger can be pulled, and therefore how much paint will be released. This can be a useful feature for beginners as a way of ensuring you don’t accidentally flood the model, but will become less important over time as you become more experienced and get a feel for the controls of your airbrush. You can see an example of this control on the Iwata Custom Micron B pictured above.
Makes & Models
There are many makes (and models) of airbrush available but some of the most popular in the miniature painting world are Badger, Iwata, Harder & Steenbeck, Paasche and Sparmax. I only have experience with the first three of these, and specifically these models:
Badger Patiot 105
This is a great beginners airbrush but can also often be found in the toolkit of the more experienced user. It’s often referred to as a ‘work horse’ and rightfully so as it’s very reliable, robust and easy to use. The needle and nozzle set is 0.5mm which is at the top end of the recommended range but fine detail can still be achieved once you become proficient with the airbrush. The Patriot 105 is also a very cost-effective choice being at the lower end of the price spectrum and yet offering years of loyal service. The only downside is the lack of a stop mechanism which, as mentioned above, can be a useful feature for beginners but is less important as you become more experienced.

Iwata HP-C Plus
This is a solid ‘middle-weight’ choice being average in terms of price, but very high quality in terms of engineering and design. It has a 0.3mm needle which is bang in the middle of the recommended range and a stop mechanism at the back. One word of warning with this airbrush is that the nozzle is threaded and very small, and it is possible to break it if you’re not careful. I am *ahem* speaking from experience here, and replacement parts for this airbrush are not cheap.

Harder & Steenbeck Infinity
This is a beautifully designed and engineered airbrush but that is reflected in the price, being the most expensive of the ones listed here. It has a stop mechanism with the added bonus of a numbered dial so you can easily set it to the right position for the amount of trigger travel you want to allow. I bought the 2-in-1 pack which includes 0.15mm and 0.4mm needle and nozzle sets. Another clever design feature is the etched markings on these parts allowing for easy identification between them. I find the 0.15mm needle too fine for acrylic paints and ended always using the 0.4mm. Even then, this airbrush seems prone to clogging more than the others I have owned, and I would say it’s the one that requires the most skill, care and maintenance to use – though it is still a beautiful airbrush.

Badger Renegade Krome
The last airbrush in my list is another Badger – the Renegade Krome. This airbrush is designed for more experienced users than the Patriot 105 and is a little more expensive. You can easily see where that money went however with the fineness of detail and atomisation of paint that can be achieved with it’s 0.3mm needle and nozzle. It has a stop mechanism at the back and while it also has a very small nozzle, like the HP-C Plus, this one is not threaded and just sits flush inside the airhead. As such it’s unlikely that you’ll damage it – just be careful when dismantling the airbrush for cleaning that you don’t lose it!
Just to reiterate – this is my no means an exhaustive list of the options available to you when it comes to airbrushes. These are just the ones I have used, and of these, the Badger airbrushes are my favourite. They may not be as aesthetically pleasing as the others, or as precisely engineered – but they just work. At the end of the day, the best tools are the ones you don’t really notice because they’re busy doing their job and not requiring your attention. That way you can get on with your job, getting your army painted, getting creative with effects and techniques, and generally having a great time in the hobby!
Compressor

As with the airbrush itself, there are many options when it comes to compressors, and a broad range of prices. But, also like the airbrush, you don’t need to spend a lot to get what you need. In fact, this is even more true with the compressor as it’s not such a precision tool – it’s really quite a simple piece of equipment and an airbrush won’t tax the capabilities of even the simplest of models.
Storage Tank
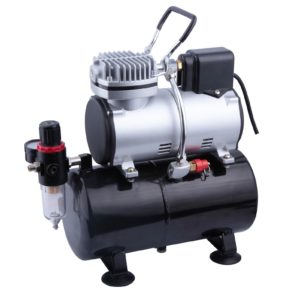
The one important feature you should look for is a storage tank. This means that the compressor will only run until the tank is topped up and then automatically switch off. This allows for silent operation for most of the duration of your spraying session – which you will find very useful as the noise of a compressor running constantly can be very annoying! In the Iwata compressor pictured above the tank is cleverly integrated into the handle.
Pressure Regulator & Moisture Trap
Another important feature is a regulator and moisture trap (also known as a water separator). This allows you to set a consistent air pressure and ensures dry, clean air when spraying.
Air Pressure
Many beginners are unsure what pressure to use when airbrushing miniatures. As a general rule, for the type and thinness of paint we use, 20psi is a good starting point. You will likely only need to deviate from this in exceptional circumstances, for example if you experience plaint splatter (common with pale / light / white paint), increase the pressure to 25 or 30psi to increase atomisation.

Hose & Adapter
One thing that deserves a mention is a hose to connect your airbrush to the compressor, because you won’t get very far without it! Most compressors will come with one – just make sure when you make your purchase. You should also check the thread size of the hose connector corresponds to that of the airbrush valve screw as this can vary between manufacturers. If they are different – don’t worry, adapters are readily available online or from most hardware stores.
AS186
The only compressor I have owned personally is the AS186 which is widely available to buy online, and it has lasted me many years despite being a fairly low cost / budget option. It seems to be a ‘white label’ product in that it’s available under several different brand names, so if you’re looking for this model, just go by the number “AS186” and something that looks like the picture opposite (with the black tank at the bottom!).
Paint

Bit of an obvious one but you’re not going to get very far aibrushing without any paint! Acrylic paint is the most commonly used in miniature paiting and pretty much any acrylic paint can be used in an airbrush provided it is adequately thinned with water (or acrtylic medium if significant thinning is necessary). There are also acrylic paint ranges designed specifically for airbrushing that can be used undiluted. Vallejo Model Air is one such range with a vast amount of colour choices. Citadel also have an Air range and many other brands such as Badger and Tamiya also produce such paints.

Primer
One of the big advantages of an airbrush in miniature wargame army painting is being able to prime your models indoors, no matter the weather outside. The best airbrush primer I have come across is Badger Ultimate (marketed under the less snappy name of Stynylrez in the US), which is available in black, grey and white. Vallejo comes a close second and has a larger range of colour options.

Thinner
There is no ‘one size fits all’ rule when it comes to thinning paint – both for brush painting and airbrushing. The thinning product and amount will vary from paint brand to paint brand, from range to range within a brand, and even individual colours within a range! For example, as mentioned above, Vallejo Model Air and Game Air paints don’t require thinning at all in most cases, but some of the lighter colours including white can benefit from a small amount of thinning. Vallejo Model Color and Game Color will almost always require some amount of thinning for airbrushing.
You can of course use water to thin acrylic paint, and this works fine in most cases. If you’re thinning significantly however, a thinning medium will help maintain the adhesion of the paint. Most paint brands sell such products forumlated for their particular ranges, but they are often interchangable.
Straining
Occasionally paint can contain lumps (especially older paint) which can give you a real clogging problem if they get into the paint cup. To avoid this you can strain your paint through a fine mesh. A good friend of mine over at the Iron Legion blog wrote a great article on using hosiery to do this, which you can even place in the paint bottle itself to create a filter!
2. Highly Recommended
The above section covers the things you absolutely must have to functionally use an airbrush, but there are a number of additional items I feel you should seriously consider getting as part of your initial setup. Some of these items concern your health & and safety, so really are quite important!

Spray Booth
While it is possible to be very accurate with an airbrush in terms of where the paint goes, some overspray is inevitable – especially when priming or applying base coats to large models. Aside from the practical issue of getting paint on your desk, walls and surrounding furniture, there is also the issue of getting atomised acrylic polymers in your lungs! For these reasons a spray booth is a very useful piece of equipment if you plan to airbrush for any length of time, and well worth investing in.
The model pictured above is the one I use and is widely available online. It works by drawing air through a dual-layered filter pad which collects the airborne particles of paint. It doesn’t have an extraction hose so can be positioned anywhere, and folds away for easy storage. The filter pads are washable and replaceable so the booth itself will last practically forever. I tend to line the inside with paper to avoid getting paint all over the internal plastic panels. The booth also comes with a turntable which is very useful.
Accessories
Respirator
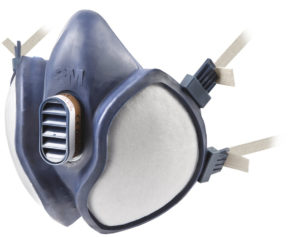
A spray booth helps a great deal with avoiding breathing in atomised paint, but for the ultimate protection against this it’s worth considering a face mask or respirator. Disposable dust masks such as you might use for DIY tasks are adequate, or you could consider something more robust such as a 3M respirator.
Cleaning Pot & Stand
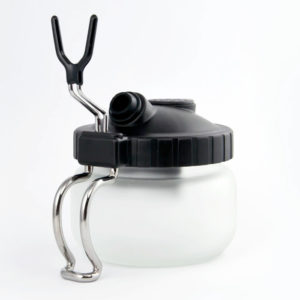
One of the things you’ll notice very quickly when you start using your airbrush is that you can’t easily put it down when it’s connected to the air source – especially when there’s paint in the cup! A good solution to this is one of the widely available stands that also double as a cleaning pot. You can safely spray any excess paint or cleaning fluid into the pot and wash it out at the end of your session.

Quick Release Coupling
Another accessory that provides a lot of convenience is a quick-release coupling for detatching the airbrush from the air hose without the need to unscrew the connecter. The exact coupling you need will depend on your airbrush, so check with your equipment supplier to make sure you get the right one.
3. Cleaning & Maintenance
This section is focused on the cleaning, maintenance and care of your airbrush. You may find you have adequate tools and materials for this purpose in your household or toolbox already, but there are a couple of specialist items you may find useful and want to consider.
Cleaning Products

Cleaning Fluid
Most brands that offer airbrush paints also sell a corresponding cleaning fluid. Buying branded cleaning fluid can get expensive however, when it’s something you will need to use frequently. Isopropyl (rubbing alcohol) can be used as a low cost, widely available alternative cleaning fluid for acrylic paint.
If you’re using enamel (oil-based) paint in your airbrush you will need odourless thinner / mineral spirits to clean up.
Cotton Pads or Paper Towels
You will need some cotton pads or paper towels to clean the larger parts of your airbrush, including the needle. You can moisten these with isopropyl or your chosen cleaning fluid.

Cotton Swabs
Cotton swabs are very useful for cleaning the smaller parts of the airbrush and inside the paint cup. Tamiya produce scale modelling specific cotton swabs in small sizes that are much more tightly wound than the cosmetic type, and therefore particularly well suited to this job. Foam swabs are also available in various sizes.

Cleaning Brushes
A set of airbrush cleaning brushes or ‘mini pipe cleaners’ can be very useful for extracting paint from the internal areas of the airbrush.

Lubricating Oil
After cleaning your airbrush with any solvents, it’s a good idea to apply a small amount of lubricating fluid to the moving parts (the needle, trigger and occasionally a small amount on any threaded areas) – to make sure everything stays smooth. I have tried several products that claim to be designed for this purpose, but I find they often have the opposite effect and end up gumming things up. The best lubricant I’ve found for this purpose is sewing machine oil, which is thin and clear in colour. A small bottle will last a very long time.

Brand-specific Tool Kits
Some airbrush brands, such as Harder & Steenbeck and Iwata, produce tools that are proprietary to the fixings and parts of their airbrushes, and may be useful in rare occurances when you need to completely disassemble the airbrush. No proprietary tools are necessary for Badger airbrushes.
Cleaning Process
When it comes to the process of cleaning, the exact steps will vary depending on your make and model of airbrush. Generally speaking, you will want to flush out the paint cup with cleaning fluid between each colour change and partly disassemble the brush to clean the needle and nozzle at the end of each session.
To clean out the paint cup between colour changes, empty any excess paint by inverting the airbrush and pouring back into the bottle or pot, or some other container for disposal. Spray any remaining paint out into your cleaning pot until the airbrush sprays clean air. Now pour a little cleaning fluid into the cup, agitate with a paintbrush and invert the airbrush again to pour out. Repeat this process but this time spray the cleaning fluid through the airbrush into the cleaning pot. Repeat again until the cleaning fluid appears clear in the cup.
For a more thorough clean at the end of your painting session, follow your airbrush manufacturer’s instructions to remove the needle, headcap, airhead and nozzle and clean these parts individually before reassembling the airbrush. You will rarely need to do more than this to clean your airbrush, but if you run into any spraying issues for which the recommended solution is a deep clean, follow the manufacturer’s instructions to further disassemble the airbrush and clean the internal parts.
Troubleshooting
Below are a list of common airbrush problems, their causes and some recommended solutions to try:
| Problem | Cause | Solution |
|---|---|---|
| Bubbles in paint cup | Loose nozzle cap or air cap | Make sure nozzle cap is finger tight |
| Improper nozzle to body connection | Remove and reinsert nozzle | |
| Cracked or damaged nozzle | Replace nozzle | |
| Skipping | Dried paint on needle tip | Clean needle with cotton swab dipped in appropriate cleaner |
| Paint too thick | Strain paint or add appropriate thinner | |
| Dirty airbrush | Perform a deep clean (see airbrush manufacturer's instructions) | |
| Cracked or damaged nozzle | Replace nozzle | |
| Not spraying | Loose needle chucking nut | Make sure needle chucking nut is finger tight then look to see if the needle is moving when trigger is pulled |
| Improper air pressure | See specific compressor instructions to raise or lower air pressure | |
| Paint too thick | Strain paint or add appropriate thinner | |
| Clogged nozzle | Clean the nozzle | |
| Cracked or damaged nozzle | Replace nozzle | |
| Spattering | Dried paint on needle tip | Clean needle with cotton swab dipped in appropriate cleaner |
| Paint build up in needle cap | Clean needle with cotton swab dipped in appropriate cleaner | |
| Air pressure too low | See specific compressor instructions to raise air pressure, also check that nozzle cap is clean and finger tight | |
| Paint too thick | Strain paint or add appropriate thinner | |
| Dirty airbrush | Perform a deep clean (see airbrush manufacturer's instructions) |
Conclusion
That concludes this guide on getting started with airbrushing miniatures. I hope you’ve enjoyed reading it and found it useful. Please comment below if you have any questions – and happy airbrushing!